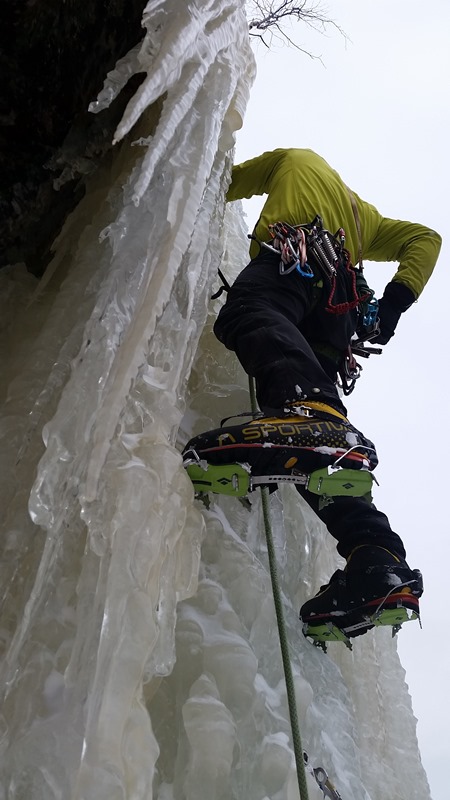
Don’t Get Screwed!
NEice takes a deep look at Ice Screws. What you need to know.
NEice takes a deep look at Ice Screws. What you need to know.
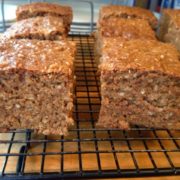
Looking for an alternative to energy/food bars? Logan bread could be the answer.
Most of my heroes are dead. I have been ice climbing for over twenty-five years. Climbing is a dangerous game but ice climbing and alpinism are even more so. Well-known climbers like Guy Lacelle, Ueli Steck, Craig Luebben, Alex Lowe, Sue Nott, and Karen McNeill had a big impact on me. I still hold them all on a high pedestal, but they are gone. A very good friend lies in the hospital right now fighting for his life. I shed tears thinking about it. Yet despite all this, I still want to climb ice and to climb hard.
We all struggle with this danger to some degree when we snap on our crampons, pick up tools, and head up a climb. Hopefully, we immediately start weighing on our previous experiences, comparing ice conditions from last week or last year, assessing our fitness level, questioning how confident we are in ourselves and our partner, and maybe even pondering how many beers we had the night before. But maybe we don’t always give enough thought as to what could happen and, in the end, our self-confidence and desire win out.
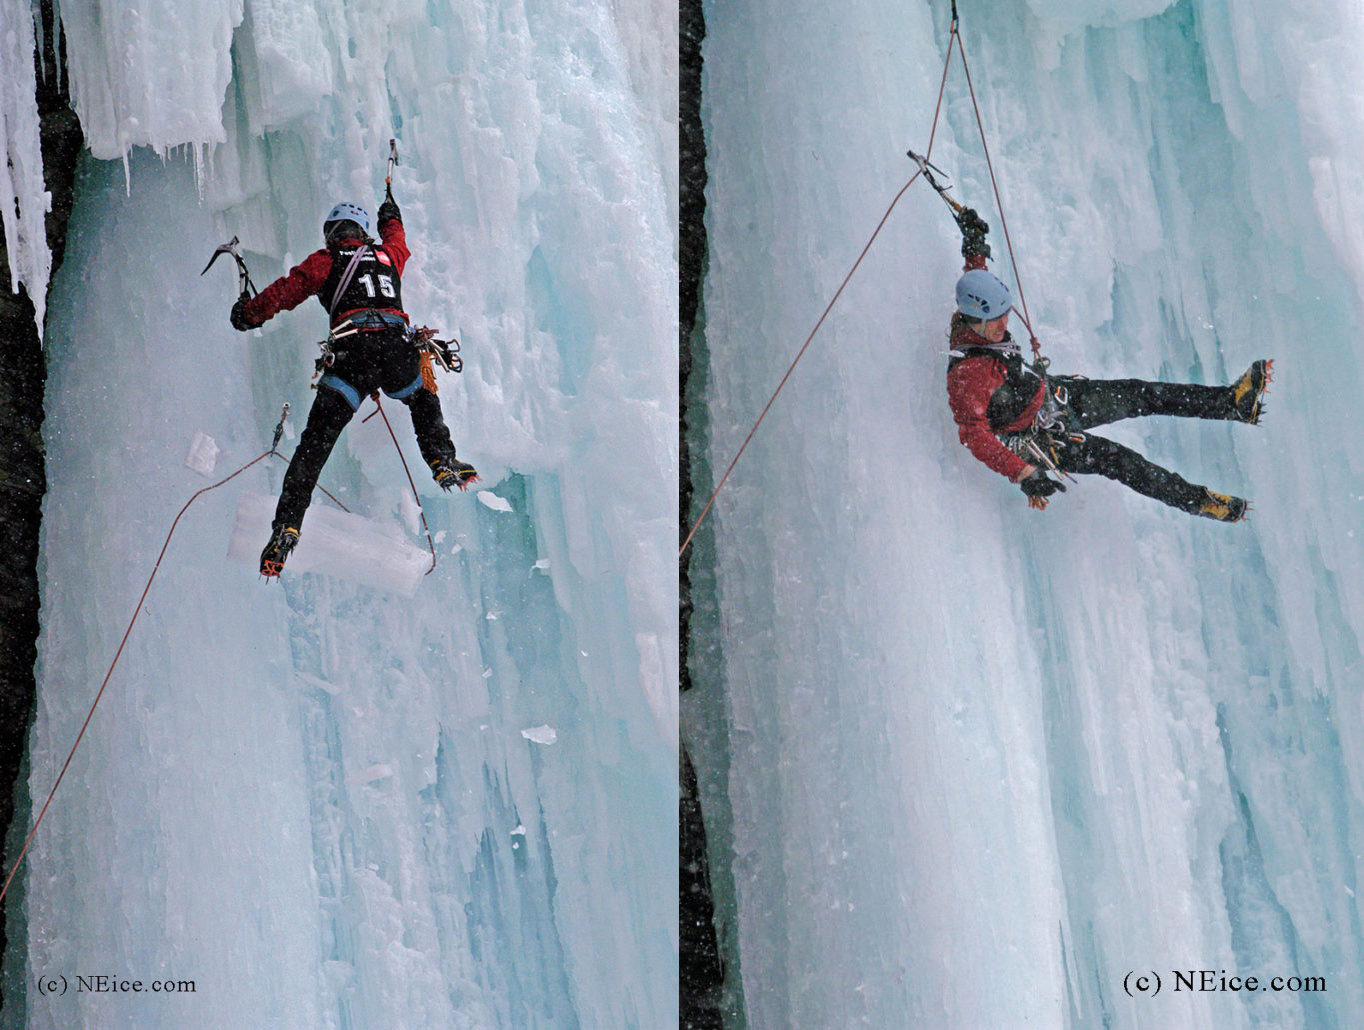
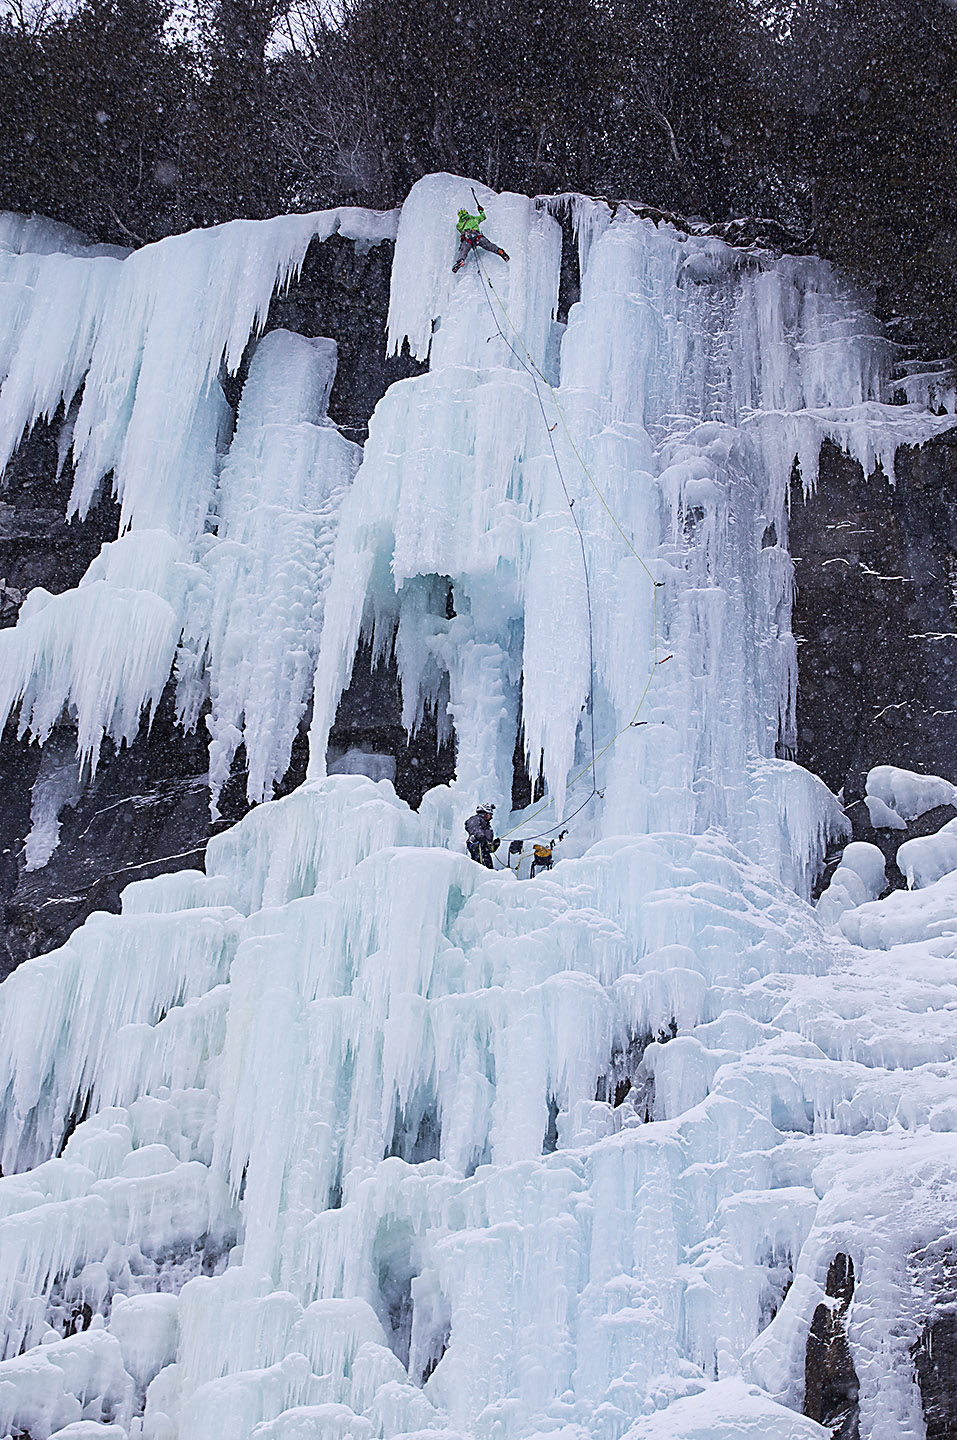
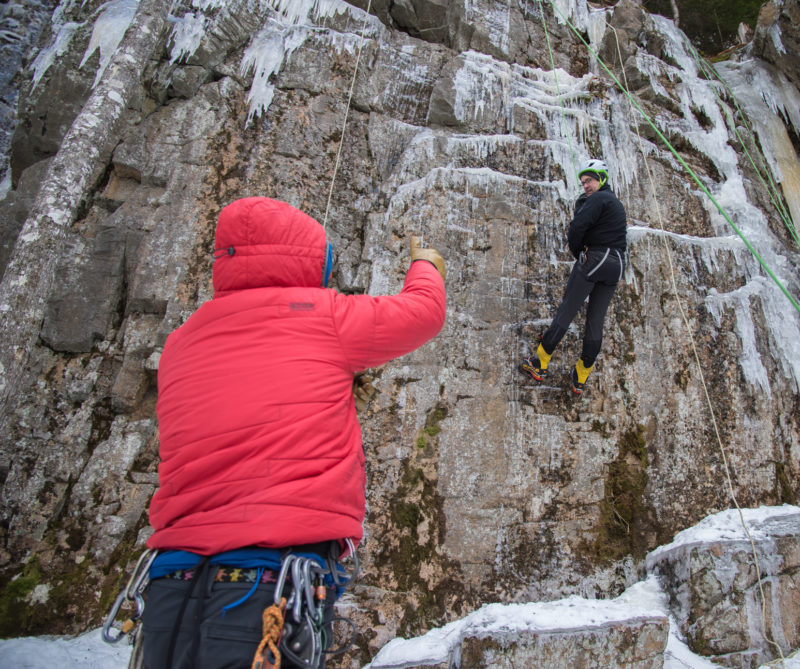
Guy Lacelle takes a lead fall during a competition at Festiglace in Quebec. A block of ice unexpectedly caught his rope. Guy was on steep ice and fell on to a single well-placed screw. Lucky! If that screw had failed he would have hit the deck.
Ice climbing is different than rock climbing. Good gear is never really ever guaranteed and neither is solid ice. What was great this morning is garbage an hour later. As we climb, we tune in to feel every creak while cranking a screw into the ice and every muscle complaining about the time it’s taking us to place the gear. Our minds are on hyper-alert as the handle spins too easily, finding that big air pocket just under the surface, telling us it’s worthless as gear and your extra exertion to improve safety was just a waste of time. Maybe you clip it anyway and keep climbing. Four more screws like that and you find yourself desperately hanging onto your tools, toes going numb from the cold, lungs sucking dry wind, arms aflame, and fear starting to dig in, leaving you feeling like a mouse in a hawk’s talons.

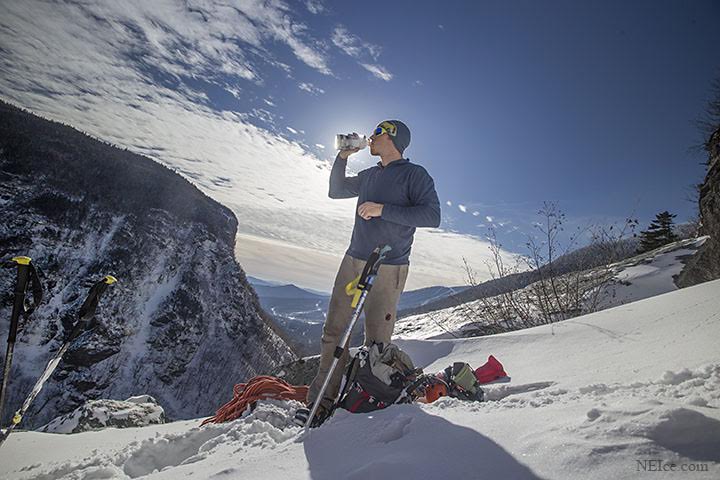
Ben Maxfield plays it safe by putting in another screw off the belay while leading on Called on Account of Rains (WI5+) at Lake Willoughby in Vermont.
Don’t fall. There it is. The cardinal rule of ice climbing. Just top-roping a dozen times on the steep pillar at the local crag doesn’t prepare you for the commitment of leading ice. Dry-tooling at the gym won’t show you what a good, safe tool placement is. It takes years to learn to accurately read ice conditions, and ideally, you should be better than a cabinet-maker who knows how to work the grain in each piece of wood just by looking at it.
Since I first started climbing ice over twenty-five years ago, one major thing that has really stuck with me through the years was a piece of advice that came from ice climbing legend Joe Josephson: “Treat every tool placement like it was an anchor.” The idea was to never settle for less than a perfect one, because as you move up, if you don’t have complete confidence in the last one you’re hanging from, you will make progressively worse placements and eventually fall. This means testing your placements before moving up on them. Not a weak little tug—yank down on it. Make sure it’s not going to blow if you accidentally twist it a little. And you will eventually twist it. A foot might blow. Your gear loop will catch on an icicle as you move up, throwing you off balance. The column you just stemmed out to will collapse and snag your lead rope.
Warm weather and sun are among the biggest enemies of ice climbers. Too often people are wooed by soft, friendly ice as the temps soar above freezing. Just because it’s still standing doesn’t mean you should climb it. A partner and I once watched the upper part of Mindbender (WI5+) at Lake Willoughby in Vermont come crashing down like a building demolition team had dropped it. Not a sound emanated from an upper section the size of a semi-truck until it pounded itself into hundreds of shards, roaring as it scattered shrapnel down the gully, damaging trees as it went. We had been standing right there an hour earlier planning to climb it. As soon as the sun came out and we felt the penetrating heat, we headed for the shadier neighboring route, Renormalization (WI4). That decision clearly saved our lives.
I’ve soloed Bridal Veil Falls (WI5+) in Colorado, Mindbender (WI5+) and Called on Account of Rains (WI5+) at Lake Willoughby, and dozens of other hard ice routes around the country, Quebec, and Newfoundland. But, unashamedly, I’ve also bailed off countless easier routes halfway up. I’ve hung on screws to shake out while leading. I’ve downclimbed when things didn’t look good. I’ve even just walked away from a chosen route because my partner and I just weren’t feeling the mojo that day. Yup, something just felt wrong. One recent year, I even backed off a WI3 I have done probably a hundred times, all because it had a brittle narrow section that looked like WI6 that day. It just didn’t look worth it.
Two years ago, I broke the cardinal rule. Until then, I was proud of the fact I hadn’t fallen on a regular ice route in over twenty years. But I fell and I fell big. My own cloud of ambition led to a dangerous fall.
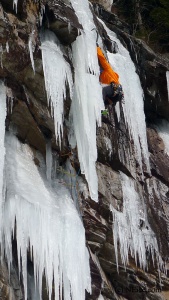
Canadian hardman Yan Mongrain leading out the top pitch of “Mindbender”(WI5+) in good conditions at Lake Willoughby in Vermont.
Andrea Charest and I had arrived at Lake Willoughby in Vermont with a big goal, determined to climb three big 5+ routes in a day. We were psyched! Conditions were perfect. The day was overcast and reasonably warm. It was 30 degrees F with mostly sticky ice. We had this already, I thought! She and I would swap leads through the day. We headed straight up from the road to Mindbender. Soon racked and ready, Andrea led up the first pitch, confidently working her way through the big overhanging mushrooms with strength to spare. From her work as an experienced guide, she quickly set up a solid anchor at a stance in a protected corner of ice below the aerated upper column and brought me up. Clipped into the anchor, I leaned out and looked up. Even the easiest line above was gnarly-looking and intimidating. I’d done the route many times, so I pushed away any doubts. After all, no time to waste: we had two more routes to do after we finished this one.
With a high-five from Andrea, I started up. The pitch was solidly in WI5+ territory. The beginning offered a pumpy overhanging bulge with bad feet. It led into aerated, weird fins of ice that offered some crappy tool placements and poor protection but hopefully getting into some good stemming opportunities. I was feeling the workout now, but I was shaking out regularly and reminding myself to breathe. I moved off a couple of sketchy placements after testing each one and moving as smoothly as I could; matching on a tool, I reached up to hook my way into the stemming corner. After a couple more heady moves, I discovered what from below looked decent, but now I was perched on a three-foot-wide, two-inch-thick window of ice with water gushing behind it. I had maybe four screws in below me. Maybe one was good. I could hear the water pounding down behind the sheet of clear ice. I placed a screw in some thicker aerated ice off to the side, trying to avoid tapping into the gusher. It looked good, but who really knows?
I continued up carefully, gently placing a front point into a divot left by an earlier tool placement. More delicate moves, testing each one, pulling straight down on it, my elbow touching the ice. Ten more feet and I made it into thicker solid ice, but now pale and rotten-looking. I cranked a long screw into the frozen sugar. The top-out was now tantalizingly close. The screw would have to do. There wasn’t time for more. I needed to get to the established belay tree, so we could rappel and get after the next route. I thunked my way up another ten feet and found only wet rock at the top, the water running down behind the ice. There was no way to access the frozen turf above. I scratched uselessly around on the rock, but feeling a little pump coming on, I down-climbed back to the screw. It was fruitless to go that way.
Looking out right, I eyed a horizontal finger of overhanging detached ice. I knew I could get up to another tree out that way. I could see frozen dirt above the ice. The feet were clearly sketchy. I’d done this stuff before, though. I needed to get to the tree; we had two more routes to do. I began hooking my tools in the space behind the top of the detached overhanging ice. Digging my front points into a smear of ice below, I drop-kneed and stretched up to reach higher, swinging hard into the frozen turf. It squished. It was just mush. Sucking in a deep breath, I stepped up higher and drop-kneed again. I swung and heard that solid thunk as the pick buried into a solid patch, partly of ice and partly old tree stump. I tugged hard. The placement felt good. Of course, it was good. I confidently unhooked my other tool from the ice finger and pulled it back to swing. Maybe one more move and I’d be at the tree.
In an instant, that one tool ripped away.
As a longtime ice climber, you know that falling will end badly, possibly even deadly if the gear fails. You should never fall. My mind pondered over what just happened. That tool placement was good, wasn’t it?
Free from the counter pressure, my legs uncoiled, propelling me outward in an arch. Over what seemed like minutes, I slowly drifted, spinning upside down. So, this is how it ends, I thought, marveling at the blue beauty of the ice as I kept falling. The screw wouldn’t hold. I came around, almost upright now, still calmly waiting for The End. The hiss of rope through carabiners ripped into my eardrums. Air rushed into my lungs. Time sped up. My legs wrenched around violently. With the harness biting into my gut, I stopped.
My feet gently brushed a huge blobby ledge of ice as I realized the last screw had held. Everything held. Andrea had been yanked off her feet, but the anchor was solid, and she was unhurt. The chaos was gone. Life was normal. Not a scratch. Fate had been oh-so-good to me.
I climbed back up through all the difficulties to the last screw. Putting my ego away in a box, I put in another two screws, built an anchor and called that the top. We rappelled off a thread in the ice and walked back down to the road. She led everything the rest of the day.
I relearned many important lessons that day: 1) Check your ego. It’s good to have confidence but be realistic; 2) If it looks dangerous, it probably is; 3) Be twice as strong as you think you need to be; 4) Sometimes the top isn’t the realistic top; 5) Quit while you’re ahead (see the previous lesson); 6) Just because someone else did it doesn’t mean you have to; 7) Some days it’s just better to leave early and go have a beer.
They aren’t guarantees of safety, but they keep the odds in your favor. I still seek to climb hard, but I try to think more about what can happen. I hope you all do, too.
~ Alden Pellett
Canadian ice climber Will Gadd has a great set of tips for climbers: http://willgadd.com/note-to-self-how-not-to-fall-off-ice-climbing/
Petzl offers some tips and techniques: https://www.petzl.com/US/en/Sport/News/2015-11-16/Tips-and-techniques-for-ice-climbing
I ran into Brent Doscher at the Mount Washington Valley Ice Fest. We were both assigned to photograph some climbing clinics. Prior, to that, he had generously provided some images for my article highlighting a climber in New Hampshire. Upon receiving the images, I immediately knew I needed to know more about him. His photographs had original and unique perspectives that only come with innate talent and years of experience honing his skills. Scrolling through his portfolio, I found myself getting drawn into the experience in which he was photographing. An extraordinary photograph will take you on an adventure with that single image, and that’s exactly what his work accomplishes.
I didn’t spend long talking with Brent when I ran into him in last month, but we kept in touch and I was glad I was able to catch up with him recently and ask him a little more about himself and his photography.
How did you get into sports photography and can you describe the evolution of your career?
I’ve been shooting professionally for 14 years; it all started with a senior project in high school when I chose sports photography as my subject. I learned as much as I could about cameras and photography as I shot my high school sports teams and then graduated onto the University of New Hampshire sports teams during my time there. After completing my degree at UNH with a minor in studio arts, I started my own event photography business. That business grew until it was an international company photographing 100 events per year, covering Spartan Races, marathons, triathlons, and heaps of other endurance events. Eventually it grew large enough that I sold it to another company, Gameface Media, and went to work for them as their director of photography where we grew the business to covering 300 events and millions of athletes per year. It was during my time there that I fell in love with climbing, both rock and ice. Ironically enough, I originally started ice climbing because I wanted to take pictures of it and figured that I should learn how to climb first. It turned out I loved climbing just as much as I love shooting it. In mid-2017, I parted ways with Gameface to try and make it on my own as an adventure sports photographer. Recently, I’ve been fortunate enough to land the cover of Trout Magazine and Wild Northeast’s fall issues, and my work has previously appeared in Men’s Journal, Runner’s World, Outside Online, and Climbing Magazine.
In your opinion, what makes a great image?
Great energy makes a great image, first and foremost. Everything else comes second. If you look at the best images that exist in the world, no matter the genre, the mood of the photo is what draws you in. I’ve taken countless photos under amazing sunsets or sunrises that just fall flat because they’re lifeless. As such, they become disposable and you never really look back on them. The images that stick in your mind are those where the subject’s energy can draw you into the photo and instantly captivate you.
What is your motivation/inspiration behind climbing and photography?
Whether I’m photographing climbing, fishing, running, or anything else, the style that I always tend to strive for in my shots is capturing the connection between the subject and nature. The best photographers in the industry are capable of capturing these amazing scenes that show you the beauty of this world at its peak moments, and by having a human subject in that image they can essentially transport you into the scene so you can feel what it would be like to be a part of that beauty.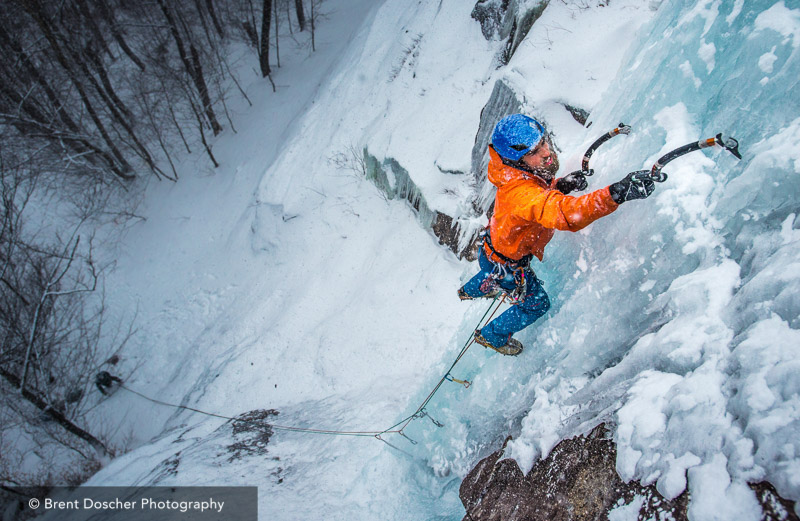
What was your most rewarding experience photographing a subject?
It’s hard to nail down a specific experience. The ones that always stand out the most are the shoots where I can be part of the objective. Being on the climb with the athletes and getting to experience all the thrills of an alpine objective alongside them is one of my favorite things about shooting ice and alpine climbing. Climbing and photography are both passions that require 100% percent of your mental energy to execute correctly, especially when you are near your limits. You have to be so dialed in your systems on both the photography side as well as the climbing side in order to make sure you never miss a moment. Additionally, you have to think through and plan every single section of the route not only from the climbing aspect, but from a photography aspect as well. I certainly still have an immense amount to learn on both sides of the house, but that’s what makes it a fun challenge.
Being part of the experience that you are documenting certainly makes for more raw and powerful images. Looking back at my photos, I frequently remember the feeling I had when I was taking specific shots, and remember the emotions of everyone else in the photo. The challenge is to convey those emotions in your imagery so that every viewer can sense the elation or despair, whatever it may be.
What was your most challenging?
The most challenging shoot was when I climbed Mt. Shasta with a friend. I didn’t have much time to adjust to the altitude, so the final 500 feet of elevation before the summit was pretty rough for me. Going upwards was hard enough in itself; throwing photography into the mix when you’re feeling that poorly makes for a pretty rough time.
Do you feel any responsibility as someone who is showcasing the sport in images to make sure the viewers perceive climbing in a certain way? For example, would you photograph solo climbing?
That’s a great question. I don’t personally feel that it’s my duty as a photographer to document only best practices. Speaking strictly from a photographic standpoint, often the most dangerous objectives make for the most impressive photos. I think that to the outsider, all climbing looks dangerous, and there are many aspects, free-soloing included, that the uninitiated would never understand. However, I’m not going to avoid shooting something because I wouldn’t personally choose to do it. There are people out there doing insane things every day, and they should be documented.
What equipment do you usually bring on a shoot?
I pack a variety of equipment depending on the objective. If we are going cragging and I can afford to bring a bunch of gear, I’ll pack a kit of multiple camera bodies and lenses so that I can have a bunch of different choices for focal lengths while I’m shooting. However, if we’re headed into the alpine I usually only bring one light DSLR with a couple select lenses; recently my picks have been the Nikkor 20mm f/1.8 and the Nikkor 50mm f/1.8 for their light weight.
How is doing work in the Northeast different from other places, and what do you like about it?
I think the Northeast has definitely been underrepresented in the past few years. With the explosion of social media, everyone is always clamoring to visit the locations with the grand, sprawling views. The Northeast doesn’t really have many of those, so I understand the draw to the Western US. However, what the Northeast lacks in grandiosity, we make up for in intensity. We have some of the burliest conditions in the lower 48, and I really love the challenge of trying to capture that in my imagery. Last year while we were on a ski trip in the north of Iceland, I was driving around town, witnessing the frigid living conditions first-hand. I said to a friend, “Why do people live here? This life is so brutal, cold and windy all the time.” His response to me was, “Why do we live in New Hampshire?” There’s something uniquely alluring about life in northern New England. It’s certainly not an easy life, but that’s what makes it exciting. Climbing is no exception to that. Our climbs can be dirty, overgrown, sweltering hot, or even covered in the snow, but it makes our area fun and it’s what I try to capture.
What’s one dream photography destination?
Last year on a flight back from Iceland, we flew over Greenland. I’m pretty sure my jaw actually dropped when I saw all the snow covered mountains. Ever since then I’ve been scheming of ways to get there.
Do you think about how you want to compose a certain shot a day/week/month before, if it’s a big job?
I definitely do. It’s a trap, but I do it anyways. One of the biggest challenges that I think every photographer learns to deal with is not always nailing the shot that they envision. No matter how large of small the shoot is, I’ll generally research the climb and go into the shoot with a few different ideas for images I’m really stoked on. Of course, 95% of the time they don’t pan out, and it’s really easy to get frustrated. However, so much of climbing and photography is just learning to adapt to the conditions, so you have to adjust. Learning to spot and capture the unplanned moments is something that comes as a great challenge to me, but I’m constantly trying to improve on it.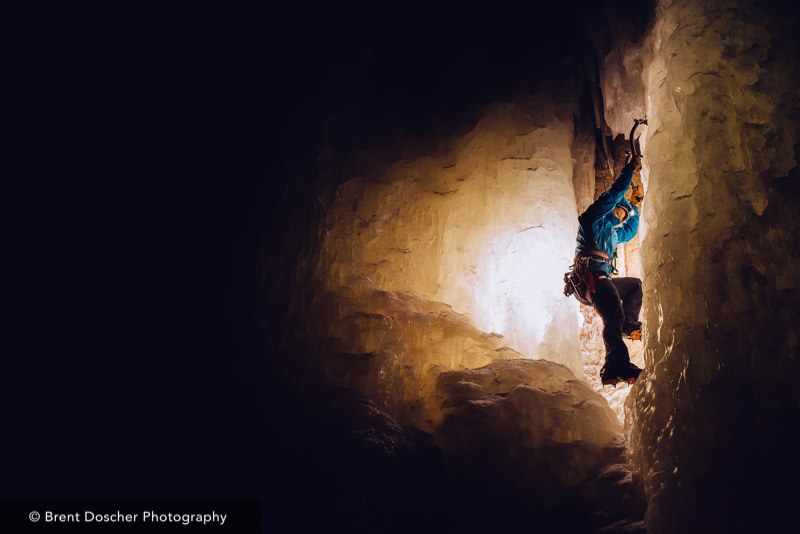
Any advice would you give aspiring sports photographers?
Spend more time studying your idols than studying the equipment. When I first got into sports photography, I was so equipment obsessed that most of my time was dedicated to researching the newest and best camera gear. I think a lot of sports photographers fall into this trap, since it’s a very equipment-heavy genre of photography. However, once I stopped caring about the gear and instead spent all that time studying the images from the greats in this industry, I drew a lot of inspiration and my photos got much better. Also, get used to the alpine start. There will be a lot of them.
You can see more of Brent Doscher’s work in the Northeast and beyond on his website: www.brentdoscher.com and you can follow him on Instagram at @bdoscher.

Peter Doucette shakes out and searches for the next edge, divot or dimple towards progress on this attempt of Cryokinesis. Photo: Ray Rice
We have to be careful. Dry tooling causes damage to the rock. With time, the damage dry tooling causes becomes tolerated, accepted, and sanctioned by some. This will ultimately destroy a rock climb and the experience for future generations of climbers.
It’s real simple. Be respectful of the rock and it’s environment. Think about future climbers. Keep your impact to a minimum. Leave as little trace as possible and remember, cumulative damage is always the problem.
~Thanks Janet for motivating me to do this post. We need this awareness.
Janet B. Wilkinson
February 11 at 9:06pm ·
I really wish people wouldn’t dry tool and dry crampon rock routes on Cathedral (or at least wouldn’t post photos here or elsewhere of it). That includes Diedre. There, I said it.
Richard Parker
Indeed, in the 90’s we saw significant rock damage at Rumney from picks and crampons…those scars are (almost) forever!
Nick Yardley
Some thoughts from the Lake District, basically if it’s a popular rock route it’s worth more as such to the general community.
Bruce Adams
Dry tooling should just go away.
Alden Pellett
Janet, even worse is the damn rock climbers thinking they own the cliff and bolting up sport routes where runout winter mixed routes were put up first!
Michael Wejchert
Yes! Diedre is climbable as an ice route when it’s in; you don’t have to touch rock on the 5.10 pitch when properly formed. Thinking it’s ok to dry tool when it’s bare rock isn’t so hot. I know it’s a weird trip down ethics lane for visiting climbers, but consider: if there’s no ice on a pitch, you’re ruining a classic rock route for future aspiring leaders.
Dry tooling should be practiced in areas not good for rock climbing and not on established rock climbs.
Train and refine your skills on artificial walls.
Find areas where rock climbers never go.
Most climbing areas now have designated cliffs where dry tooling is accepted. Find out where they are.
Go to alpine areas for the best training.
Seek out advice and guidance from professional climbing guides.
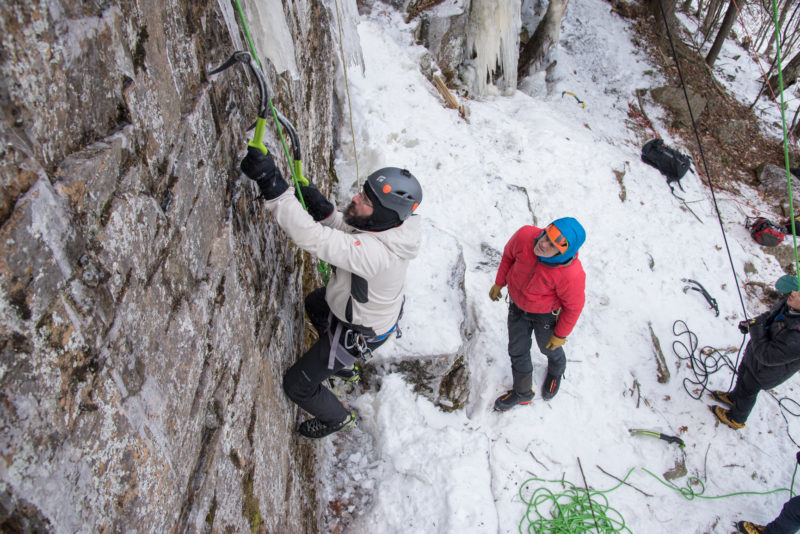
Ryan Stefiuk guides participants in mixed climbing techniques at the Mt. Washington Valley Ice Fest. Photos: Courtney Ley
Dry tooling on popular and classic rock climbs with no ice.
Scratching your way up a climb. If you are inexperienced and at your limit, think about leaving it for another day. Strong and skilled climbers can often do a climb leaving hardly a mark.
Not asking for local information on what is acceptable and where to go. What’s acceptable at one cliff is completely off limits at another. Educate yourself in the local ways.
Think about the damage you may do to the rock if you climb it with ice tools.
Think about the cumulative effect of many climbers over time.
Think about future generations, and how you might change their experience of the climb.
Have the common sense to move on when conditions are not right for a non-destructive assent.
Be careful when rappelling. Crampons scratch the rock more during rappels than during ascents.
Mixed climbers need to think about their actions to prevent future access problems.
NO!
The universal consensus is that no popular, established rock climb should be dry tooled.
If it’s a popular rock route, it’s worth more to the climbing community as a rock climb, than as a dry tool climb.
Guidebook authors need to include dry tooling areas, information and local ethics. Don Mellor, author of Blue Lines 2: An Adirondack Ice Climber’s Guide, says, “While I have no interest in or right to tell others what to do in their recreation time, as a guidebook writer I do not want to be complicit in encouraging people to scar rock with ice gear.”
Popular rock routes have been climbed in winter for years, but not with the frequency we have today. We must be aware of the cumulative damage we are causing and take action to prevent it.
We need to generate public knowledge and awareness of the problem.
We need leaders in the community to promote good dry tooling ethics.
We need to be specific with what climbs are acceptable to dry tool in a given area and ones that are forbidden.
Posting less on social media about sensitive climbs will help keep the traffic down.
Posting more on social media about good dry tooling ethics and setting good examples is the right thing to do.
When you are out climbing, think about the damage you may cause before you climb rock with ice tools. Most often, you have two choices. Do, or try the climb, no matter the condition or what your impact might be. Or you can be thoughtful, respectful, and considerate of others, the environment and the future. Make the right choose for the environment and others. Our climbs and climbing areas are a finite resource that we need to protect!
~Doug Millen
The Access Fund – (pdf) MIXED EMOTIONS: THE IMPACTS AND IMPLICATIONS OF DRY-TOOLING
Sources: Facebook, The Access Fund, Blue Lines,
We like Naked A-thread rappel anchors. Threads with rope or slings left behind are nothing more than Alpine trash.
Steve will be at this years Mountainfest in the Adirondacks, Jan. 12-14, 2018. Don’t miss his slideshow Saturday Night. NEice will be there with hot soup and flying the NEice Drones to capture this event from the air. It looks like the cold weather will continue and the conditions should be great! Hope to see you there. Information on The Mountainfest can be found here…
Yes, it is great to get that early season tick and bragging rights, but the risks are high for the inexperienced. Inexperienced? Think before you ice climb and have an honest look at your skill set, gear and abilities.
– By Alden Pellett
My leg plunges through the crust into the waist-deep snow again. I fight to keep my balance on the slope but find myself in an embarrassing situation: my pack pulling me over backwards, my arms flailing, I am wallowing upside down and swimming in a heavy layer of powder. It’s not my first rodeo post-holing up a steep approach to ice climb in Smuggler’s Notch, Vermont, but this time my pack feels three times heavier than usual. It’s the start of a new year, and like many people traditionally do, I had my New Year’s resolution. I resolved right then and there, I needed to lose some of this weight.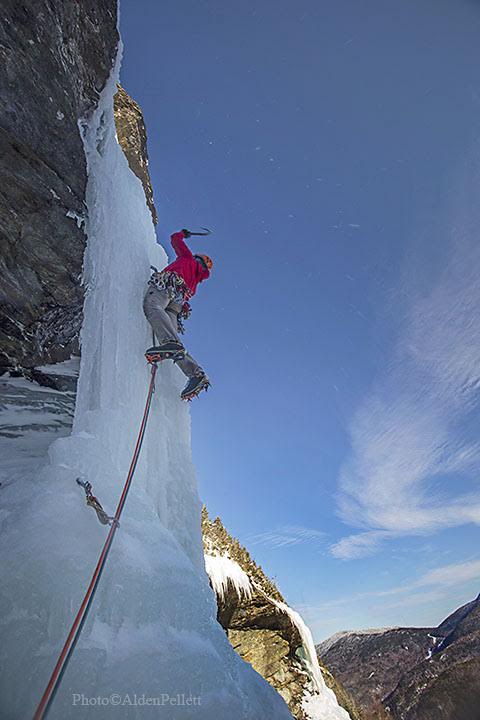
A week ago, I stood with IFMGA guide Silas Rossi, owner of Alpine-Logic in New Paltz, N.Y., below “Mindbender”, WI5+, at Lake Willoughby. We peered up at the unrelenting steepness and started getting ready to swap leads up some fairly mean-looking terrain. If there is one place in the Northeast that gets you sweating just thinking about how heavy your rack is, it’s there.
With that in mind, Silas offers up this bit of advice: “Do more with less. A lot of people carry too much on their harness. Three lockers, a belay plate, a cord, and a 4′ runner. A prussic loop and your rack and draws should suffice most of the time.”
I caught up with another one of the strongest climbers and guides in the East, IFMGA guide and Piolet D’Or-nominee Kevin Mahoney to get his take on how to improve on my slimming New Year’s resolution. When it comes to mixed terrain and keeping it light, Mahoney says to go for the Ultralight BD cams. When on ice, he explained, he pares things down even further by sizing down screws and carrying more of the short 10cm rigs.
AMGA Rock Instructor and Assistant Alpine Guide, Matt Shove, who runs Ragged Mountain Guides in Plainville, Conn., echoes Mahoney and Rossi, recommending the lightest in new carabiners and slings. To paraphrase Matt, if you’re carrying around ten-year-old carabiners, it’s time to upgrade. Matt is also pretty enthusiastic about one of his favorite lightweight tools, the J Snare. “It’s the lightest ‘V’ thread tool. There are no sharp points, so it won’t shred your pack, your expensive belay parka, or more importantly, your lunch.“ In fact, we at NEIce are witnessing many guides putting this baby on their racks this winter!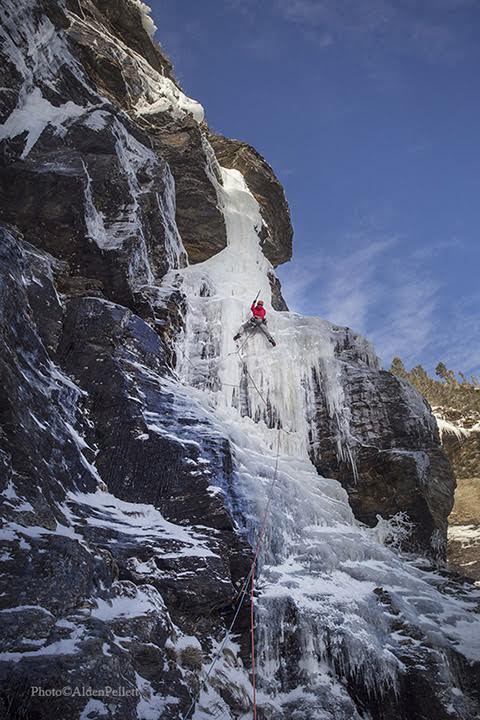
Perhaps Rossi sums it up best, “Update to modern gear, everything from carabiners, runners, screws, clothing, boots, crampons.” Today’s new equipment, he says, “…keeps getting lighter and lighter.”
Petzl Laser Speed Light screws: These babies are sharp! They bite into ice ridiculously fast and weigh next to nothing. They cost more than others but on a long pitch or route, the weight savings is really a game changer. Some of our test guides say they don’t seem as durable over time as the Black Diamond’s Turbo Express screw, but for ‘fast and light’, there is really no substitute.
https://www.petzl.com/CA/en/Sport/Anchors/LASER-SPEED-LIGHT#.WGvuQFwsLAM
Mammut Twilight 7.5mm ropes: Got the feeling that your rope is trying to pull you off the climb? At 38 grams per meter, you’ll shave some real pounds off the trek towards that big route with the latest in skinny ropes. At times on some difficult ice leads, I’ve almost forgotten I have these tied to me.
Beal makes an even skinnier set of ropes: their Gully 7.3 Unicore ropes. Regardless of the brand, these thinner models thread nicely into the ice for rappels, leave no trace, and make carrying extra cordage up a route for descents almost obsolete.
https://www.mammut.ch/US/en_US/B2C-Kategorie/Equipment/Ropes/Half-and-Twin-Ropes/7-5-Twilight-Dry/p/2010-02760-1144
Patagonia Galvanized pants: Superlight with all the features an ice climber needs including suspenders. NEIce founder and longtime gear tester Doug Millen says he’s run these pants all over the White Mountains this season already. From soloing long easy routes to beating them through deep snow approaches, they’ve performed for him, no complaints.
http://www.patagonia.com/product/mens-galvanized-pants-for-alpine-climbing/83155.html
Stanley Adventure Stainless Steel 17 oz. vacuum bottle: Personally, this is one tool I won’t ever go without on a cold day of ice climbing. At under a pound dry weight, I bring it up anything longer than a single pitch. A good cup of hot honeyed ginger tea before leading up a steep pitch is worth its weight and this is a sweet rig that takes a beating. Stanley also offers larger sizes but this fits right in my ruck alongside my puffy belay parka.
http://www.stanley-pmi.com/store/stanley/en_US/pd/ThemeID.39334800/productID.324175400
Lightweight carabiners: There’s so many now that it’s hard to pick just one brand. Petzl’s Attache’ locking carabiner is a popular one, and at just 56 grams, it’s a keeper. Pair one of those with Mammut’s Wall microlocks (47 grams) for safe clip-in points at the belays and you might start seeing the slim results in the mirror. DMM also offers a super light version: The Sentinel MS locker ticks in at 54 grams. Like I said, there’s a lot of choice out there. For this category, it won’t hurt to take a trip to your local gear store and watch the pounds melt off your rack.
Petzl Attache’ locker
https://www.petzl.com/I/en/Sport/Carabiners-and-quickdraws/ATTACHE#.WG1NCFwsLAM
DMM Sentinel HMS locker
http://dmmclimbing.com/products/sentinel-hms/
Mammut Wall Microlock
https://www.mammut.ch/US/en_US/B2C-Kategorie/Alpine-Climbing/Mixed-and-Ice-Climbing/Wall-Micro-Lock/p/2210-01260-1502-1
Alden Pellett, Photographer
www.aldenpellett.com
By William Bevans
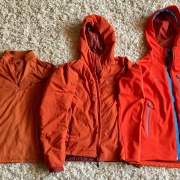
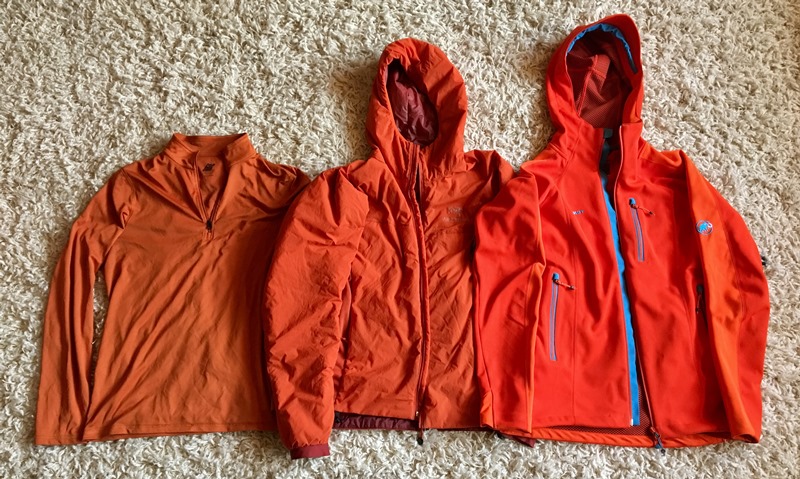
Your comfort and even survival in the backcountry is highly dependent on your layering system. Since a single piece of apparel cannot do the job, many different layers are used in sync to adapt to the constantly changing conditions. In this article, I will outline the basic three layer system commonly employed in alpine climbing with some extra considerations and tips. Below are the three foundational clothing layers generally utilized:
The main purpose of your base layer is to wick moisture away from your body. This is your first line of defense because if this fails, your whole system will fail. First and most importantly, do not ever use cotton products. Cotton products will wick a small amount of moisture away from your body but will not rid the moisture completely or properly. Cotton acts like a sponge and if you are wearing wet cotton in cold temperatures, your body will struggle to stay warm. In an alpine environment, this can lead to numbers of issues, including hypothermia.
On your cold zero dark thirty (12:30am) start right out the tent, you may feel the need to pile the layers on. Once you get moving, however, you’ll find yourself heating up. Start managing that heat so your base layer can manage the moisture. You have a long day ahead and if you get wet early its gonna be even a longer day!
The two common base layer fabrics are wool and synthetic. Which one you decide to use is a matter of personal preference.
Synthetic layers include the poly-groups (polyester, polypropylene). Synthetics are generally inexpensive, dry very quickly, pack down efficiently, and tend to be quite durable. The downside is that they provide little insulation and therefore, only a small amount of body-warming qualities. Some claim poly fabrics retain odor, but usually you have bigger concerns on a climbing trip than having stinky clothes! On longer, two month expeditions, I often take my synthetics and wash them in a large hot water bowl with soap, lay them on my tent and after a few hours in the sun, they are clean and good to go.
Wool has seen many improvements recently and has made a strong comeback into the outdoor clothing industry. The common wool used is known as merino wool. Efficient insulating properties and excellent breathability are wool’s top trademarks. Wool comes at a price, typically higher than synthetics. One of the common complaints of wool is that it can be itchy. If you decide to dunk your wool in a bowl of hot water, you should certainly expect it to take considerably longer to dry than a synthetic.
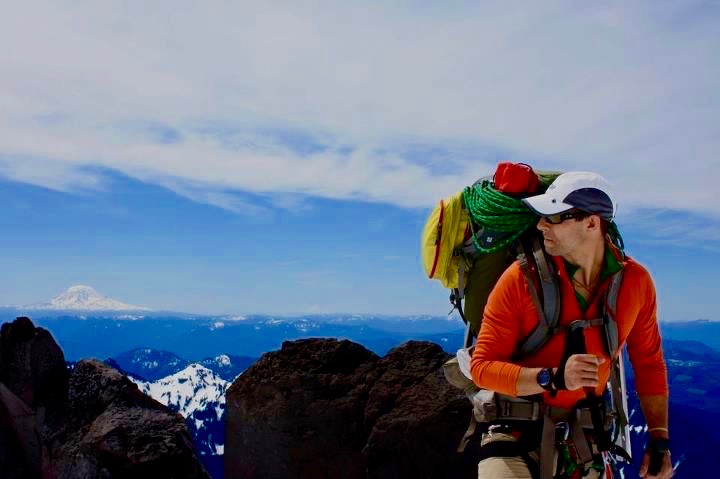
Using quarter zip synthetic base layers on the Kautz Glacier, Mt Rainier.
2) Insulation layer
Your insulation layer’s primary role is to keep you warm and to regulate your temperature though breathability. Insulation can come in the form of fleece, which can be broken down into several different weights (100, 200, 300) combined with several other technical fabrics (windstopper, etc…). In alpine climbing, loft insulation is considered the benchmark where warmth is key. There are generally two types of loft insulation: synthetic and down fill.
Synthetic Insulation: In short, synthetic insulation jackets have come a long way. In today’s market, there are several synthetic jackets geared towards climbers that perform very well. Gone are the days where down fill insulation was simply unmatched. Top brands have developed jackets to handle your entire day start to finish, from a high output ski approach, to swinging tools, to a quick summit tag in full raging conditions to the long descent back to the car. These jackets that once didn’t pack so well now pack very nicely. While down fill still remains the best insulator, the biggest improvement with synthetics is the breathability factor and the jacket’s ability to regulate temperature. The clammy feeling that went along with synthetics is a thing of the past. Synthetic jackets can dry fast when wet and continue to keep you warm when wet. Synthetic jackets remain at a lower price than down jackets and for the earth conscious climber, many jackets now have insulation produced from recycled materials.
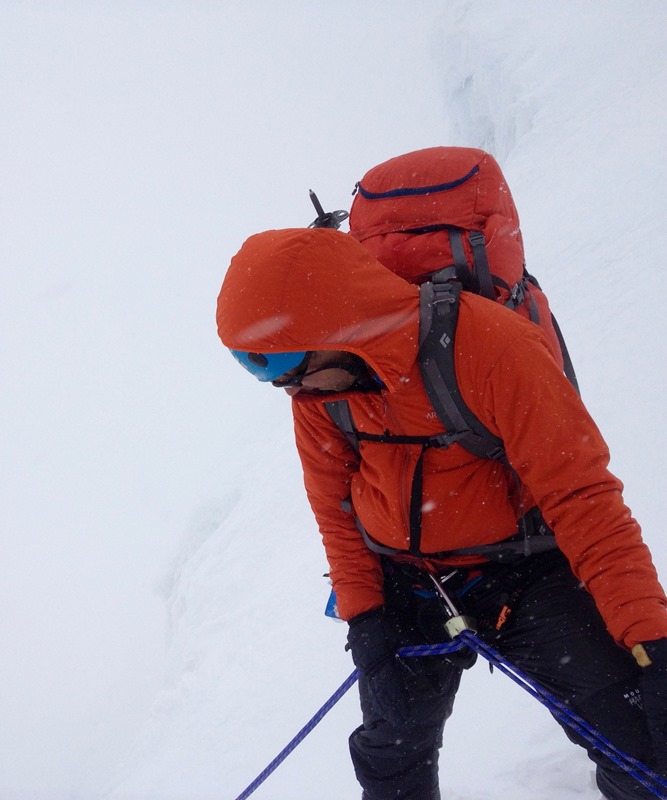
Synthetic insulation catching a beating on Alpamayo, Peru
Down Fill Insulation: For those venturing into the mountains where the cold is a major factor, down fill insulation is the gold standard. Down-fill insulation comes in several weights, from lower grade 550-fill to a no compromise 900-fill power. Fill power measures the amount of puffiness, which directly effects the amount of air the down fill can hold and ultimately insulate. Fill powers commonly seen by alpinists are 600, 750 and 800. I generally recommend utilizing down at 750-fill power and above. If the fill weights are still a little confusing, think of the lower grade down fills as ones you would use to walk around town. When in the mountains, having higher grade down really does make a lot of difference. To see first hand, go to your local store and compress a 600-fill jacket and then compress an 800-fill jacket. The compressibility makes a major difference. When down is taken care of it last several years and continues to keep you warm like no other product. Down has excellent breathability and packs down like a dream. The negative: down is always priced higher than synthetics and the higher the fill, the higher the price. Down is also useless if it becomes wet, so be very conscious of the condition of your jacket and limitations of your jacket shell. Overall think of your down jacket as an investment piece of gear and if you take care of it, it will take good care of you.
Your shell layer is your main line of defense against the elements. Your shell layer keeps your insulation layer, your base layer and you dry and warm. Shell layers are built to take a beating. They come in two different constructions: hard shell and soft shell.
Soft Shell: There are a few major differences between soft shell construction and hard shell jackets. Soft shells are designed with fabrics with superior ergonomics, performance and movement in mind. The user will experience a jacket that “flows” and wears much smoother with them than a hard shell.
Many different types of fabrics are used in soft shell construction and each provides a very different experience based upon activity type and conditions.
Soft shells are more breathable than hard shells, but they do a mixture of repelling and absorbing the outdoors. They don’t completely protect you against snow, wind or water, so the trade off is performance and comfort versus weather defense. All soft shells are going to respond to weather differently, so it is important you try to dial in the comfort level you have with your jacket slowly. Consider using a soft shell for shorter trips, roadside ice or places where you are very comfortable with conditions.
Hard Shell: Hard shell jackets are the ultimate guard against the elements. A hard shell will use materials that do not allow water or wind to penetrate the fabric. The downside to this defense is that the fabric does not breathe as well as a soft shell. Another downside to the hard shell is lack of ergonomics and how the jacket wears during activity. The hard shell is going to feel a little bulkier and have a general lack of smooth movement. Both soft and hard shells are pricey but hey…what isn’t in climbing anymore?
Soft shell on the sharp end of Snot Rocket (W5) Mt. Willard, NH
For epic cold outings bring a belay jacket. When your up at Lake Willoughby ripping up Twenty Below Zero Gully and your soul is on its way to being frozen stiff, a belay parka may just save you! A belay jacket provides the highest levels of warmth and protection when mountain conditions begin to rage on you. This jacket earned its title for saving you during the periods of time when your caught on the belay ledge while your partner stitches the last pitch and the mercury has seriously begun to dip. The belay jacket will allow you to remain warm and focus on your belay duties instead of suffering from the cold. On the flip side, a belay jacket is also great in big mountain base camp settings, or just back at the climbing cabin when your just hanging around by the stove waiting for your partner to make a hot brew and heat up the tasteless evening gruel. The versatility of this jacket that excels in the field, and on your downtime makes it a staple in every climber’s closet. A belay parka/jacket is cut two different ways. The parka is cut bigger and will usually cover your harness and have a bulkier feel. A jacket will be waist cut and fall just above your harness. Which you pick is just a matter of preference. Sometimes the parka zipper can come up a bit from the bottom and this will allow you to clearly see your belay loop, tie-in knots and such. While in the field, keep in mind you will be taking this jacket on and off and stuffing it in your pack constantly. This jacket will be taking a good beating, so pick a good one.
To wrap up, I hope this helps with all your layering needs. Dial in your alpine costumes at home before you head out. Buy the gear you like and don’t make a habit out of compromising. If you like your gear, you’ll look good; if you look good, you’ll feel good; if you feel good, you’ll climb good, and if you climb good, you’ll be happy!
About the Author: William Bevans is a New England based alpinist with over 20 years of experience in the mountains. His studies are concentrated in the area of technical alpine and high altitude mountaineering. He has completed climbs and led expeditions in the Cascades, Rockies, Alps, Himalayas, Andes, and big walls in Yosemite, Zion and Mexico. Currently he is involved in mentoring next generation alpinists and climbing the New England classics.
A great article from local New Hampshire guide, Peter Doucette of Mountain Sense Guides on how to manage ice fall during climbing.
“Getting pummeled by ice takes the fun out of ice climbing. Whether the falling ice is generated by another climber or is a spontaneous event, the consequences of being hit are usually the same. Alongside managing the cold, risk management around ice fall is something I spend extensive time assessing, avoiding when possible and managing when necessary. Here are a few ideas for doing just that.”
“Climbers as a culture tend to go for it, charging optimistically and enthusiastically. And I encourage that. It’s the quality of doing this blindly that’s worth examining.”
Read the full article from Outdoor Research here…
Photos by Doug Millen & Gabe Rogel
Your ice climbing connection for New England, the Northeast and Beyond!