Protecting The Ice We Climb
by Doug Millen
It’s a never-ending battle, what will an ice screw hold? In real life situations. How can we protect an ice climb with it’s ever changing condition
What I do
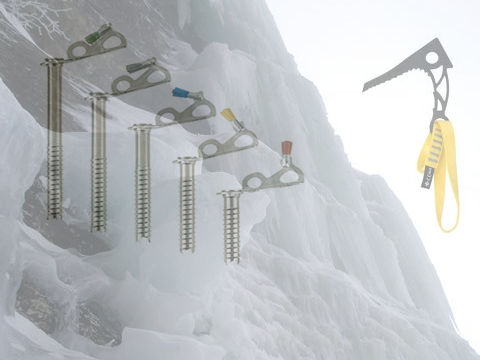
1. I carry a variety of ice screw lengths. Ice comes in all thickness and densities. Many climbers carry only short & medium screws. They say you only need that amount of thread to hold and they don’t want the extra weight. But what about the surface layer? The quality of the ice? I have seen very few climbers clear away the first layer before placing a screw. If that layer is damaged, ie Sun baked, wet, new or other wises damaged or uneven, THE SCREW WILL NOT WORK AS ANTICIPATED! Use a longer screw or clear away the first layer to good ice. The weight difference in carrying longer screws is minimal. You could carry two longer screws versus two medium length screws for about the same weight as a light carabiner. Worth it…and the cost for of caring longer screws? At most only $1.00 ea.
2. Most popular climbs have a number of ice screw placements at common stances leaving less virgin & unfractured ice to place a screw. Where should you place your screw? Use a long screw and put in the best existing placement that will not bottom out. You will grab new ice, way back in where it counts. and save time and energy.
3. Ice screws are not bolts! The level of protection depends on the quality of the ice and the skill of the climber. Practice and learn the craft of ice protection.
4. Ice screws should be placed at 90 degrees to the ice or at a slight downward angle of 10-15 degrees. A positive angle for the screw may be better if the ice is of poor quality. In good ice conditions angle the screw in the direction of pull. It’s the threads that hold. If a screw bottoms out never tie it off with a sling, it has been shown that the hanger will cut most slings. If the hanger is 5cm (about 2 inches) or less from the ice, clip the hanger. Otherwise use a shorter screw.
5. In some situations, a tied off icicle is better than a screw and easy to place. Look around, be creative and carry the necessary slings. They are light and easy to carry.
6. Protect often and closer together at the start of your climb. You never know when something could happen. As you get farther out, there is less chance of hitting the deck and less force on the system, and ultimately, the screws. Modern ice screws are easy to place and worth the effort to place them often for safe climbing.
7. Carry a Spectre. In bad ice and varied conditions, a spectre will hold when nothing else will. Frozen cracks, earth or moss are the perfect terrain for the Spectre. Black Diamond designed the Spectre Ice Piton to provide “alternative, pound-in protection on mixed and thin ice lines where traditional pro is just a pipe dream”.
8. Better to place 2 equalized screws from a stance than 2 bad screws on the fly when leading up steep ice. It inspires more confidence and uses less energy.
9. Screamers will provide added protection in climbing. Screamers not only absorb energy directly because of the stitch ripping effect, they also allow your rope to absorb more energy from the fall by increasing the time interval of the fall. The standard Screamer can effectively reduce peak loads by 3-4kN in any climbing system. You don’t need to carry Screamers for every screw. You only need them after leaving the belay where the most force could be put on a screw with a fall. Other situations may require screamers to limit the force put on protection so carry a few but not one for every screw.
10. Never pass up rock protection. Rock is typically better protection than ice. If the climb looks like you might be able to use rock gear, bring it!
Placing Ice Screws
• You first need to clear away any rotten, soft ice or snow, until you reach good, solid ice. Use your pick to create a small hole in which to start the screw.
• A favorable location for an ice-screw placement is the same as for an ice tool. A good choice is a natural depression, where fracture lines caused by the screw are not as likely to reach the surface. Never in a bulge.
• Choose a spot in the ice near your waist rather than above your head for better leverage while twisting it in. This will also de pump your arms and conserve energy. In some instances it may be beneficial to place the screw as high as you can to better protect the climb.
• As you work the screw in, clear away any ice that fractures around it.
• Keep turning until the eye or hanger is flush with the ice surface and pointing down-slope in the direction of pull.
• Keep screw placements around 2 feet apart when setting up a belay.
• Back up sketchy screw placements with a second screw and equalize.
• After a screw is removed, ice inside the core must be cleaned out , immediately if the ice is wet and it is below freezing. Always tap the hanger end and never the threads. If you blow in the ice screw from the hanger end the worm air will melt the ice and eject it from the tube. Careful, don’t freeze you lips to the screw.
Energy-Saving Tips
• Climbing extremely steep ice is fatiguing, physically and mentally. To conserve energy and keep moving upward efficiently, plan ahead. Look for every rest and take advantage of it.
• Protect from stance to stance. Having a good idea where you will stop and place the next screw is key. Climb to that spot and don’t think about anything but getting to that spot. Stopping in route at a strenuous or awkward spot is not an option and will strip your energy.
• Look at the ice above and figure out what screws you will need and rack them for easy access. Re-rack at good stances for the upcoming ice. Nothing wastes energy like fiddling with gear and trying to reach screws on the other side of your harness.
• On moderate to steep ice, it may help to kick a step for standing on as you place the screw. Place your foot french style on any budge or flat spot you can find. This will save your calves. On extremely steep ice, however, it’s too difficult, so save your energy. When it’s time to place an ice screw, do it from your front points, and then continue climbing.
• Keep the weight on your feet! Holding on to the axes too hard and supporting you weight from the axes strips your strength. Your legs are use to holding you up all day, use that advantage and the axes for balance and movement.
• Keep everything SHARP! Sharp gear conserves energy and makes climbing safer and more enjoyable.
V-Threads
Information on using and making a V-Thread
Links on using ice protection from the manufactures
* Sources and Images from: Black Diamond Equipment, Petzl & NEice Member Trarr3

